When it comes to homemade holiday treats, few recipes strike the perfect balance between simplicity and indulgence quite like Caramel Peanut Clusters. These bite-sized candies manage to deliver everything we love about festive sweets in one irresistible package: buttery caramel, crunchy peanuts, smooth chocolate, and that perfect balance of sweet and salty. Even better? They require no baking, no fancy equipment, and no difficult techniques—just a handful of ingredients and a few minutes of hands-on time.
For many home bakers, the holiday season can feel overwhelming with cookie swaps, treat plates, classroom party requests, and family gatherings happening all at once. That’s where recipes like this shine. Caramel Peanut Clusters are not only delicious and impressive-looking—they’re exceptionally easy, cost-friendly, and crowd-pleasing. They also store beautifully, making them a perfect make-ahead dessert option.
Whether you’re building a cookie box, gifting tins of homemade candy, or simply wanting something sweet after dinner, these clusters are the answer. Let’s dive into everything you need to know to make them perfectly every time.
⭐ Why You’ll Love This Recipe
-
Only a few ingredients: Peanuts, caramel, chocolate—simple and timeless.
-
Quick prep: Most of your time is just waiting for the clusters to set.
-
Customizable: Use milk, dark, or white chocolate; salted or unsalted peanuts; add sea salt flakes or even drizzle contrasting chocolate.
-
Beginner-friendly: Absolutely no candy thermometer needed.
-
Perfect for gifting: They package well and stay fresh for days.
Ingredients You’ll Need
Here’s what goes into a perfect batch of homemade Caramel Peanut Clusters:
For the Caramel Base
-
1 bag (11 oz) soft caramels
(Such as Kraft or Werther’s soft caramels) -
2 tablespoons heavy cream
Helps melt the caramel smoothly and prevents burning. -
1 ½ – 2 cups roasted peanuts
Salted peanuts add great contrast, but unsalted work as well.
For the Chocolate Coating
-
2 cups chocolate chips or melting chocolate
Use milk chocolate for a classic taste or dark chocolate for a richer flavor. -
1 tablespoon coconut oil or shortening (optional)
Helps give the coating a smooth, glossy finish.
Optional Add-Ins or Toppings
-
Sea salt flakes
-
Crushed pretzels
-
White chocolate drizzle
-
Toffee bits
⭐ Step-By-Step Instructions
Below is the easy process that turns everyday ingredients into shiny, gorgeous homemade candies.
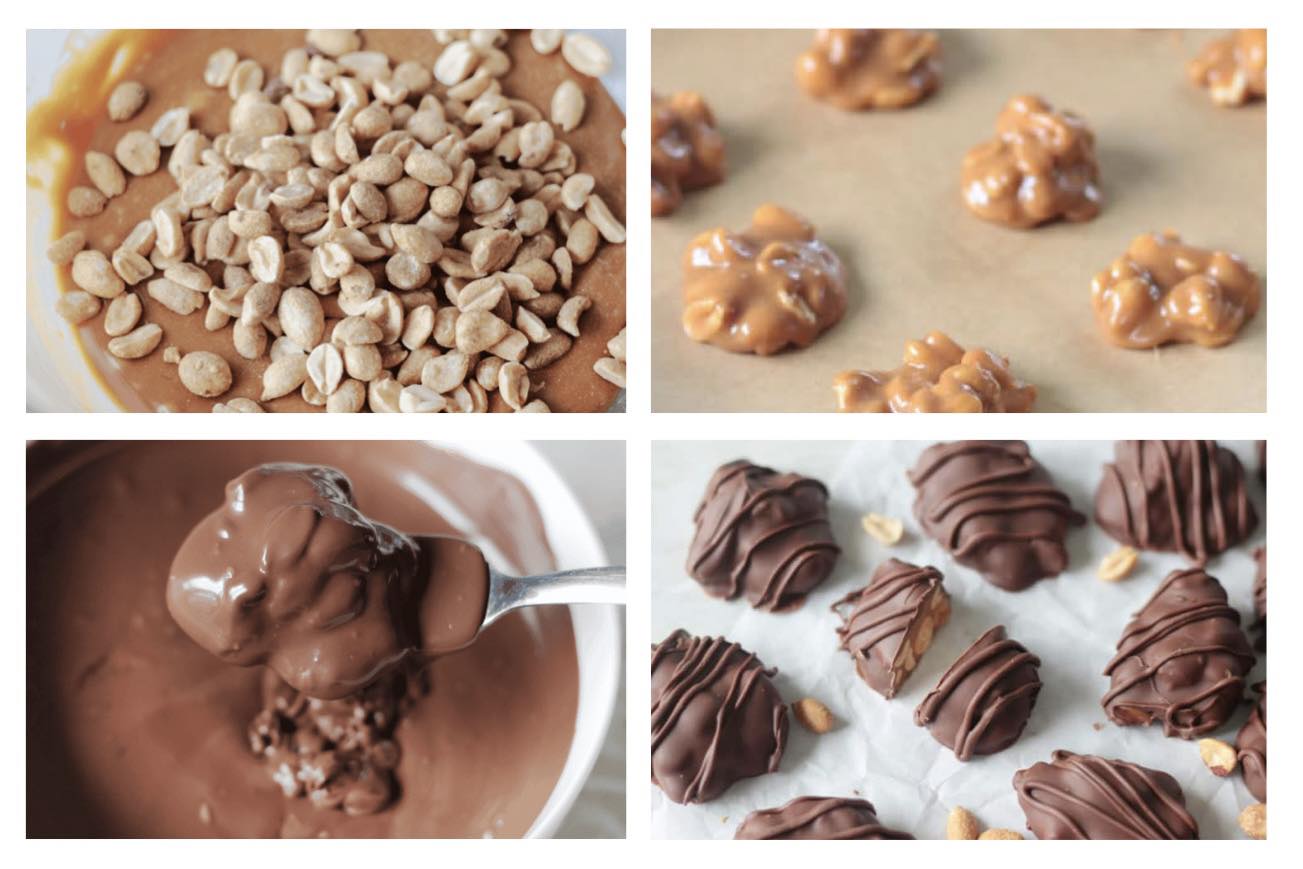
STEP 1 — Melt the Caramel
Unwrap your caramels and place them into a microwave-safe bowl along with the heavy cream.
Heat in 30-second intervals, stirring in between, until completely melted and smooth.
This step is important:
-
The cream keeps the caramel from becoming too stiff.
-
Stirring frequently prevents scorching and ensures a silky texture.
Once melted, the caramel should be thick but pourable.
STEP 2 — Add the Peanuts
Pour the roasted peanuts directly into the melted caramel.
Use a sturdy spatula to fold everything together until every peanut is coated.
This creates the classic caramel cluster texture—gooey, chewy, and crunchy all at once.
STEP 3 — Form the Clusters
Line a baking sheet with parchment or wax paper.
Using a spoon, drop small mounds of the caramel-peanut mixture onto the sheet.
Tips for shaping:
-
Make them all roughly the same size for even coating later.
-
Leave space between each cluster so they don’t stick together.
-
Work fairly fast—caramel thickens as it cools.
Once shaped, allow the clusters to sit for 10–15 minutes to firm up a bit.
STEP 4 — Melt the Chocolate
In a clean microwave-safe bowl, melt your chocolate with a small amount of coconut oil if using.
Heat in 20–30 second intervals, stirring until smooth.
You want the chocolate silky and fluid, ideal for dipping.
STEP 5 — Dip the Clusters
Using a fork or dipping utensil, carefully lower each caramel cluster into the melted chocolate.
Tap off excess chocolate and place each dipped cluster back onto the lined tray.
This coating gives the cluster:
-
A beautiful glossy finish
-
A delicious snap when you bite into it
-
Protection that keeps the caramel soft inside
If desired, drizzle leftover chocolate on top or sprinkle sea salt before the chocolate sets.
